Debugging
Debugging is essential when developing anything in the firmware because it will help you identify and fix errors in your code, ensuring that things runs correctly. It allows you to detect syntax, logic, and runtime issues that could cause your program to crash or behave unexpectedly. The RP2040 interacts with various peripherals (e.g., GPIO, I2C, SPI). Debugging helps you ensure that these interactions are working correctly, especially when dealing with timing-sensitive operations.
By catching and resolving issues early in the development process, debugging helps you build more reliable and efficient code, saving time and preventing complex problems later on.
UART (TTL) to USB Serial Monitor
To set up an RP2040 microcontroller to use UART communication over USB on GPIO 00 and 01, follow these steps:
Pin Configuration
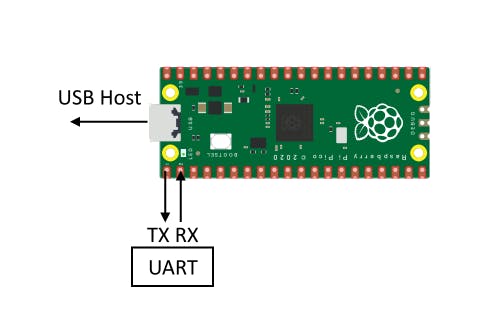
The RP2040 has two UART peripherals (UART0 and UART1). To use GPIO 00 and GPIO 01 for UART communication, you will need to leave GPIO 00 and 01 free in all GPIO pin assignments in the Board config including I2C add-ons and display, USB Host assignments or button assignments. Here's how the pins map:
- GPIO 00: UART0 TX (Transmit)
- GPIO 01: UART0 RX (Receive)
Circuit Setup

- Connect USB Host to your PC to use it as a controller.
- Connect GPIO 00 (TX) to the RX pin of the USB-to-UART Serial Port Module.
- Connect GPIO 01 (RX) to the TX pin of the USB-to-UART Serial Port Module.
Make sure the ground (GND) of the RP2040 is connected to the ground of the USB-to-UART Serial Port Module to establish a common reference.
In the event that no messages appear in serial monitor, reverse the pin connections.
Software Configuration
In the firmware, you will need to
- Add
stdio_init_all();to theprocess()function of your feature or add-on - Include the
iostreamC++ library to the executable (i.e. file.cpp) - Use
printf()will output to whatever serial monitor you use to read the USB serial port.
For formatting the serial message, see https://cplusplus.com/reference/cstdio/printf/
Read Messages via Serial Monitor
There are a number of serial monitor applications that can be used to read printed messages. Examples include, but are not limited to:
- PuTTY (Windows or Linux)
- iTerm2 (MacOS)
- picocom (Linux)
- Serial Monitor VS Code Extension (Windows, MacOS, Linux)
- Windows Terminal (Windows)
- Default Terminal Application (Linux or MacOS)
By default, the baud rate is set to 115200Hz.